|
Canvasio3D Pro
Plugin for WordPress | Version 2.0.7 |
Thank you for your Interest on our 3D-Plugin for WordPress
If you have any questions that are beyond the scope of this documentation, please feel free to contact us via email.
Your team from virtuell werk
Attention: Versions from 2.0.0 or higher are not compatible to older versions.
So please make a backup of your last plugin installation before update to 2.0.3!
Table of Contents
Canvasio3D Pro installation:
|
Canvasio3D Pro is an easy to install Plugin, with that you can show and configure 3D-Models of various formats in WordPress*
Before any further install or Updates, please deactivated and delete the latest Version of the Canvasio3D Pro Plugin! |
|
Upload a 3D-Model:
|
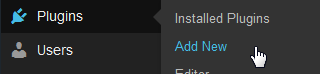
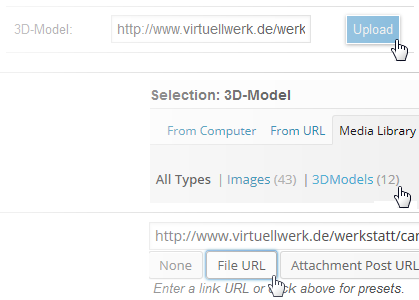
To upload a 3D-Model, click left on Canvasio3D Pro in the Dashboard of WordPress and then on the next Menu "3D-Model: Upload".
After the WordPress Medialibrary is open, can you select one or more Files to upload, or search in the Library already stored
3D-Models for loading in Canvasio3D Pro.
Simply click on the Menu text "3DModels" and then select your 3D-Model.
Make sure that the switch on the bottom of the Library is on "File-URL".
|
 |
Zip-File:
You can also upload a zip file, which contains all the data for one or more 3D-Models.
Simply click in the menu: [Model | Setup] on the icon to the left of Upload.
After transmission, the data will be stored as usual in the upload directory of WordPress.
Make sure that there are in the Zip-File no subdirectories!
The File Name of a 3D-Model in the Format: .obj with a associated .mtl File must be the same, such as: 3D_Model.obj and 3D_Model.mtl.
When a 3D-Model is displayed only white or black, might it be due, that the Texture cannot be loaded. Pay attention to uppercase and lowercase letters of the File name for the Model Texture, especially in the endings such as:. .Jpg or .JPG.
Insert a 3D-Window in WordPress
|
To display your Models on a WordPress Page, you will find different functions in the Template Menu by Canvasio3D Pro.
There can you adjust the size, the color, or the shadow of the 3D-Window for a Template.
After this, the following Shortcode becomes automatically inserted into your Page:
The Template area is only displayed, if you are sign in as Administrator in WordPress! |
 |
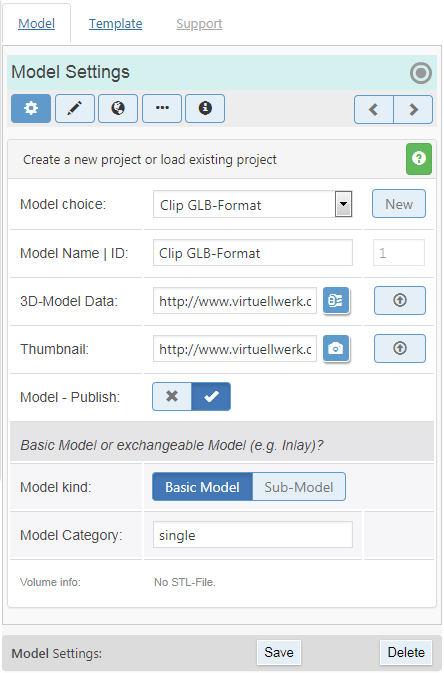
Model: Setup
|
Here can you create a new Model and upload an appropriate Thumbnail. (The preview will be shown later on the Template Page in the Sliders).
Basic-Model and Sub-Model | ConnectionIf you want that your Visitors can connect two Models with each other, for example: "insert a Stone in a Ring", simply proceed as follows:
The Words of the categories are only used internally by Canvasio3D Pro and will not shown to your Visitors.
Zip-File upload
Make sure that there are in the Zip-File no subdirectories! |
 |
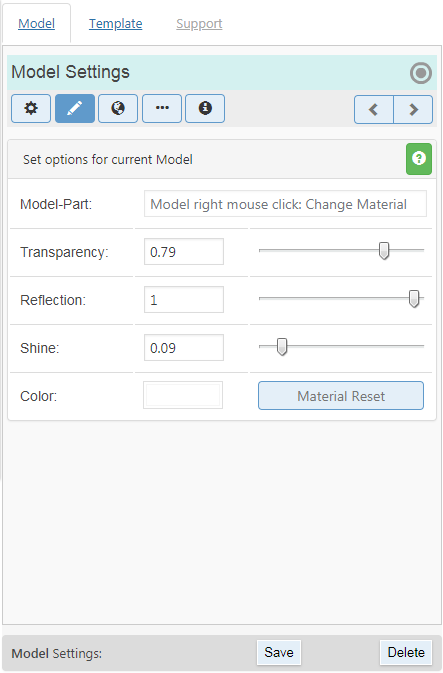
Model: Style
Material Settings
In this area can you change the individuell material library of the loaded Model. |
 |
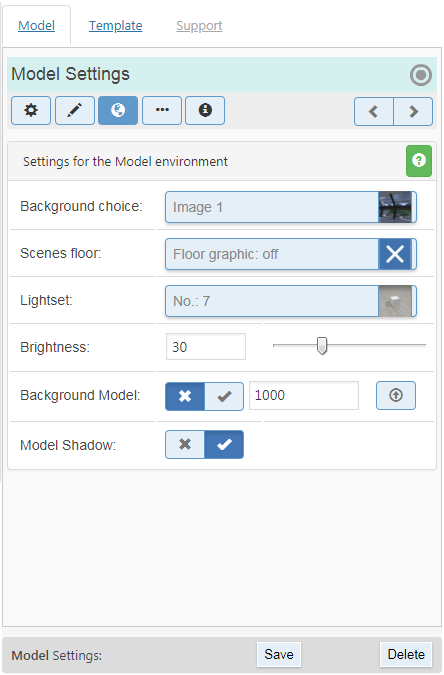
Model: Environment
|
This Menu allows you to set the appearance of the Background of the Model.
Technik Tipp
The Images for the scenes background are called "Qube-Maps / Skyboxes" and there are located here on your Web-Server, in the Plugin Directory of Wordpress:
|
 |
Model: X | Y | Z | Anchor Point
|
If you want, can your Site Visitors combine two Models by simply clicking. For example, inserting a Gemstone in a Ring.
|
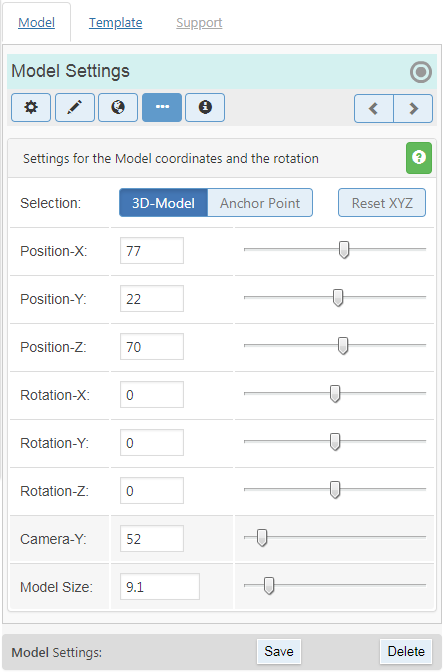 |
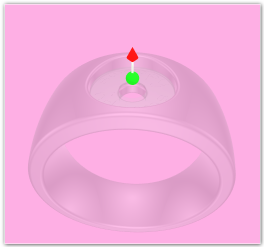
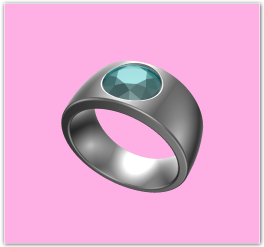
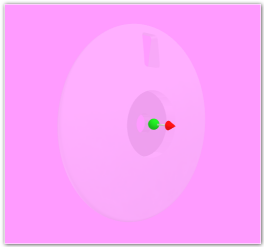
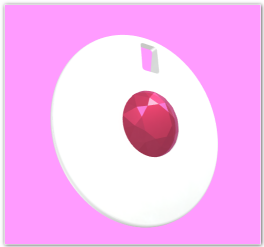
For this, set the align and position of the red arrow (anchor) so, that it fits with the combined Models (For example, your Gemstones into a the Ring).
Each Model has an internal 3D Axis that determines its position and orientation. This internal Axis is replaced later for the partial Model when combining the settings that have been defined by the Anchor Point.
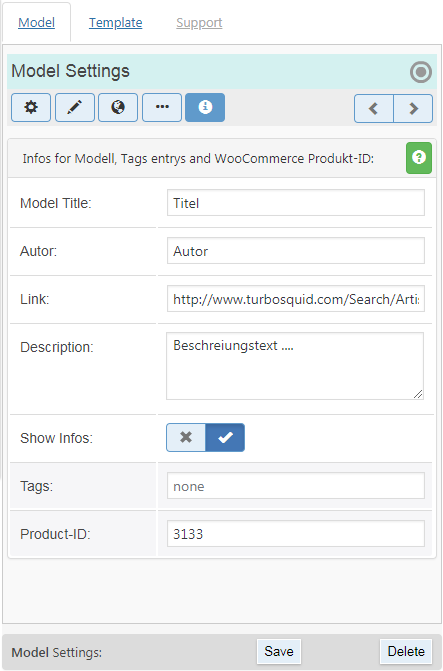
Set in the Template Menu: "Setup" WooCommerce to On, if you want to sell your Products through WooCommerce. In the Model Menu: "Info" can you insert the Product-ID of the WooCommerce Product, that fits to your Model.
The Model size
Programs with that 3D Models are designed, have very different scales for the Model size. Therefore it may be after inviting a Model, that you do not see it because it is either too big and does not fit into the field of view, or too small to detect it. Therefore, first push the knob for the size from the left to right Side and the model size is hereby changed. Should the Model be too large even at 1, can you also enter a smaller value in the text box, for example: 0.5.
Model: Infos
|
In this Area can you enter additional Informations for a Model.
The TagsIn the text Box "Tags" can you enter several terms that describe the Model, for example: Silver, Ring, Red. Separate the Words in this case by a comma.The Tags are shown on the WordPress Site via an Image-Box and can be used by Visitors as search filters for other Models. The Names of the author is also clickable as search filters for other Models. |
 |
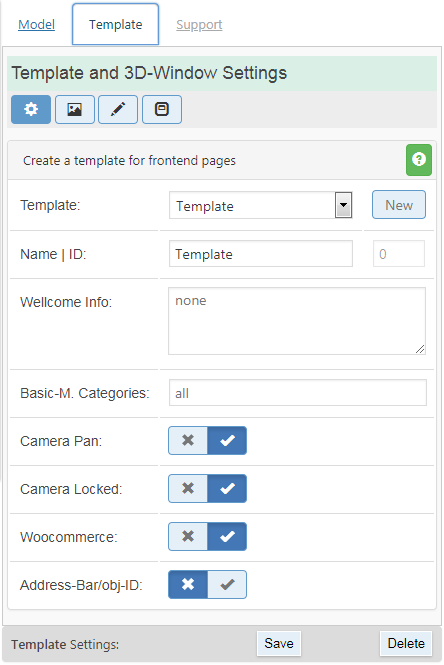
Template: Setup
|
In this menu can you create Templates for different WordPress Pages.
To do this, simply enter in the Canvasio3D Pro shortcode the Template-ID,
which appears in this menu on the right side of the "Name" field in light gray.
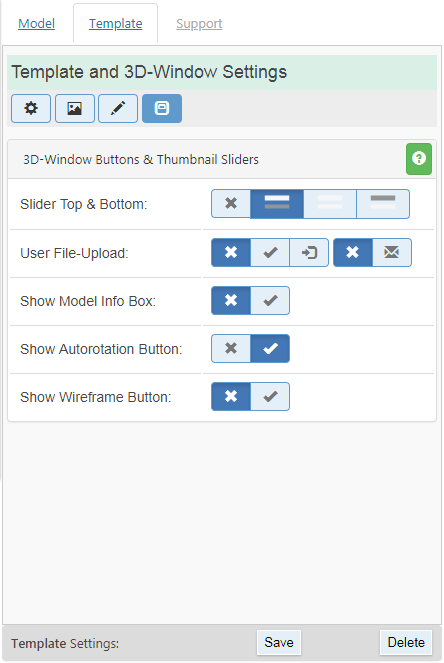
Address-BarIn most browsers is an Address-Bar in the upper part, which displays the selected Address (URL) of the visited Site.Canvasio3D Pro adds automatically the Model-ID of the currently displayed Model in the Address-Bar. Visitors can thus save the URL of the selected Model as bookmark, share to friends, or receive appear in another visit to the Site again. The automatic change of the URL is done without reloading the Page, as this would be lead to unnecessary load times at large Models. If your WordPress Template is not show the Address (URL) correctly, or an installed plugin does not work properly, can you turn off the function of the Address-Bar here. User File-UploadIf you wish that visitors can upload own 3D-Models in a zip file or images on your server or Webspace, set the upload to "public use" or "only after registration". An upload without registration, however, is not recommended. The uploaded data is stored here in this directory: wp-content/uploads/canvasio3d/ ... guest (at no registration) ... or name of the User (after login). The Template Area is only displayed when you have logged in as an Administrator in WordPress! |
|
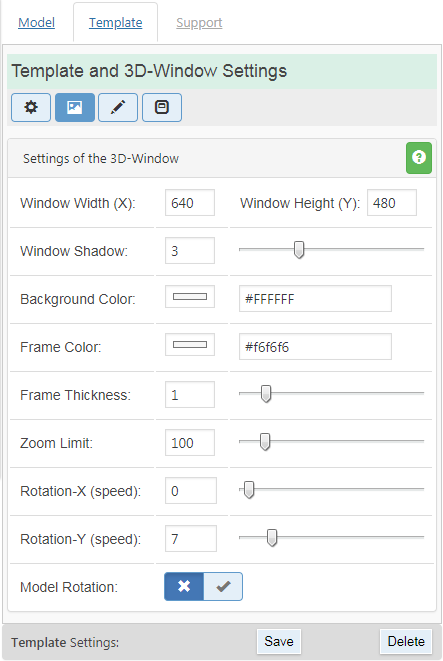
Template: 3D-Window
|
Each Template has a 3D-Window in which all Models are shown. Here can you adjust the size of the 3D-Window, or for example set a border around the 3D-Window.
Model Rotation:For the automatic Model rotation, switch here "Model Rotation" to on and select the speed for the left/right (x) and up/down (y) rotation. Zoom Limit:Set the "Zoom in" Limit for the Camera. |
 |
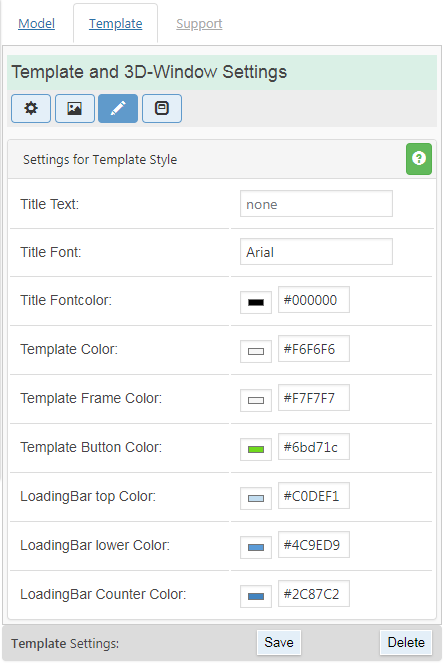
Template: Style
|
If you want to change the Color of the Canvasio3D Pro Template, can you here adjust the Colors that fit to your WordPress Theme, or change here easy the colors for the Loading Bar. |
 |
Template: Buttons
|
For each Template can you show one or two Sliders for the thumbnails and you can display additional Information about the selected 3D-Model at the bottom of the 3D-Window in a Info-Box. Slider
For the Slider can you choose whether one- or two to be shown in the Tempate.
If you choose two Sliders, than would are Sub-Model ever shown on the second Slider.
|
 |
Software Disclaimer
|
THIS SOFTWARE IS PROVIDED BY THE COPYRIGHT HOLDERS AND CONTRIBUTORS "AS IS" AND ANY EXPRESS OR IMPLIED WARRANTIES, INCLUDING, BUT NOT LIMITED TO, THE IMPLIED WARRANTIES OF MERCHANTABILITY AND FITNESS FOR A PARTICULAR PURPOSE ARE DISCLAIMED. IN NO EVENT SHALL THE COPYRIGHT HOLDER OR CONTRIBUTORS BE LIABLE FOR ANY DIRECT, INDIRECT, INCIDENTAL, SPECIAL, EXEMPLARY, OR CONSEQUENTIAL DAMAGES (INCLUDING, BUT NOT LIMITED TO, PROCUREMENT OF SUBSTITUTE GOODS OR SERVICES; LOSS OF USE, DATA, OR PROFITS; OR BUSINESS INTERRUPTION) HOWEVER CAUSED AND ON ANY THEORY OF LIABILITY, WHETHER IN CONTRACT, STRICT LIABILITY, OR TORT (INCLUDING NEGLIGENCE OR OTHERWISE) ARISING IN ANY WAY OUT OF THE USE OF THIS SOFTWARE, EVEN IF ADVISED OF THE POSSIBILITY OF SUCH DAMAGE. *Since March 2011, WebGL is supported by Google’s Chrome and Mozilla’s Firefox Web browser, and is enabled by default in browser prerelease versions of Safari and Opera. WebGL requires a 3D hardware acceleration (3D graphics card / 3D chip). Source: Wikipedia |