|
|
Canvasio3D | next generation
Viewer for 3D-Graphic in WordPress Documentation updated: 28.02.2024 |
Thank you for your interest on our 3D-Graphic Plugin for WordPress
If you have any questions that are beyond the scope of this documentation, please feel free to contact us via email
Your team from virtuell werk | germany
Table of Contents
Plugin installation
|
 |
First start with Canvasio3D
|
Canvasio3D is the 3D-Viewer for WordPress that show 3D-Graphic interactive in your WordPress pages.
If you need a 3D-Model for testing: Click here to download |
 |
|
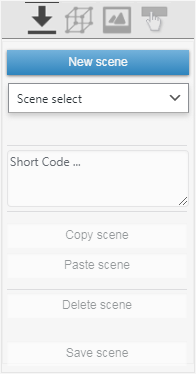
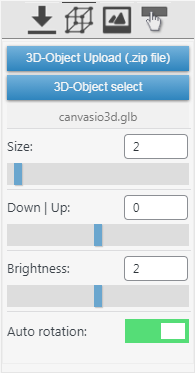
After creating a New scene or Scene select can you use the Menu button above Model Settings Model upload:Before you can upload the 3D-Data for your 3D-Models should you compressed this in a Zip-Folder! Zip-Folder: Insert all data for one- or more Models in a single folder on you Desktop and save this folder as Zip-File. If you like, read here more about: Model Zip-Folder After creating a Zip-File, click on the button 3D-Object Upload (.zip) Model settings:With a uploaded 3D-Model can you setup here the Model Size and the position with Down / Up or change the Brightness of a scene. If you like can you also turn the Auto rotation to on, so the Camera rotated automatic around the Scene after loading a page. We recommended for a single model a size maximal of 15MB as zip-file or 30MB for a unpacked Model! |
 |
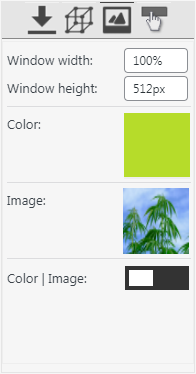
Setup the 3D-Window for a WordPress PageIn the upper menu Window Settings you can make the following necessary entries for a single 3D-Window: Width and Height: Set here the Window size in pixel (px) or in percent (100%) Color: Select a color for the background of the 3D-Window Image: Select a image for the background of the 3D-Window Color | Image: Select which background will shown in the 3D-Window And in the next top Menu "Button Settings" can you switch this buttons for a single 3D-Window: 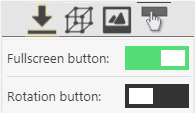
|
 |
Canvasio3D Light
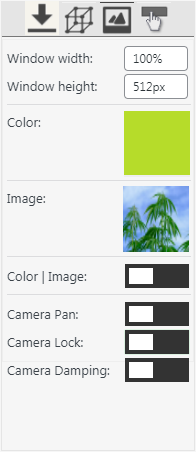
Setup the 3D-Window for a WordPress PageCanvasio3D Light supports more than one short-code entry and you can insert many HQ-Graphic scenes in a single Page. But be careful not to load to many Scenes, as this can slow down the loading time of the website considerably. We recommended for a single model a size maximal of 15MB as zip-file or 30MB for a unpacked Model! In the upper menu Window Settings you can make the following necessary entries for a single 3D-Window: Width and Height: Set here the Window size in pixel (px) or in percent (100%) Color: Select a color for the background of the 3D-Window Image: Select a image for the background of the 3D-Window Color | Image: Select which background will shown in the 3D-Window Camera Pan: With this switch can you enabled the right mouse to move the scene around Camera Lock: This switch lock the camera view, so that a model floor cannot be viewed Camera Damping: This switch set the camera to a smooth dynamic glide movement In the next top Menu "Button Settings" can you switch this buttons for a every 3D-Window and you can also enable the button for a Wireframe view: 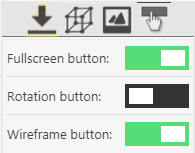
|
 |
Canvasio3D Pro
|
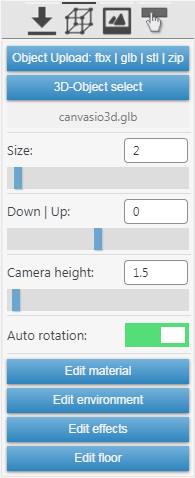
Model Settings | Main Menu Canvasio3D Pro supported now (As of V1.4.3) also the WordPress Media view and thus shows an optimal overview of the stored scenes. With a uploaded 3D-Model can you setup here the Model Size and the position with Down / Up for a scene. If you like can you also turn the Auto rotation to on, so the Camera rotated automatic around the Scene after loading a page. Also can you set here the Camera height that used when the 3D-Windows where loaded. We recommended for a single model a size maximal of 15MB as zip-file or 30MB for a unpacked Model! From here can you also enter the Sub-Menus: Edit material | Edit enviroment | Edit effects | Edit floor Thumbnails and Images to load different scenes If you like can you use any WordPress image to load a different scene in a page. |
 |
|
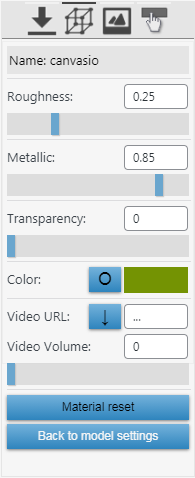
Model Settings: Edit material Most models have one or more materials for different model parts. For example: In a car is one material set for the body in blue and another for all four wheels in black rubber, that you can here select with a right mouse click to change this rubber material for all wheels. To change the Material settings: Click a model part with the right mouse button. Note that you always edit one material set that could also be assigned to different parts of your model! (As described above in the example with the rubber wheels). After a right click can you change the selected material with the values of: roughness, metallic, transparency or color. Setup a Video as texture for a material:
If you want, you can also assign a video to a material here. For this select first the model material with a right click than select the URL for a Video and enabled it with the toggle button left to the color field. Note: some Videos have sound or music, but this play only when a user do select the page or an page element!
|
 |
|
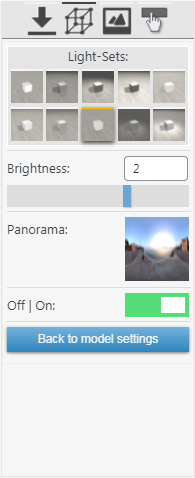
Model Settings: Edit enviroment In this menu you can select a Light set and also adjust the Brightness for a scene. With the Panorama function of Canvasio3D Pro can you here select and enabled a 360 degree Image for a scene background. We have prepared some pictures that you can found here: Panorama images download So you can easy un-zip the images and upload it to your WordPress Media. If you looking for more panorama images visit a website like e.g. hdrihaven. (Select there ever to download the 8K Tonemapped JPG in the lower menu on the page). |
 |
|
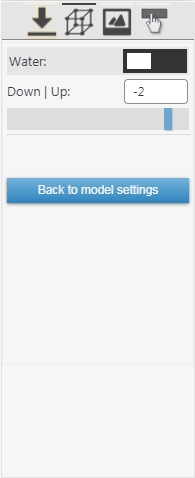
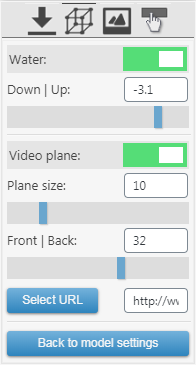
Model Settings: Edit effects Here can you switch on a nice Water-Effect to a scene.To make this effect look best, we also recommend using this together with a 360° background. |
 |
|
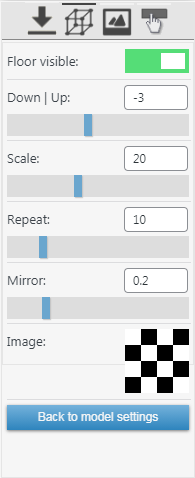
Model Settings: Edit floor In Canvasio3D Pro can you here easy add a mirror Floor to your scene. That is very practical, because many 3D-Models have not a bottom surface, but sometimes a scene looks better with yet somehow. |
 |
|
Window Settings Canvasio3D Pro supports more than one short-code entry and you can insert many HQ-Graphic scenes in a single Page. But be careful not to load to many Scenes, as this can slow down the loading time of the website considerably. We recommended for a single model a size maximal of 15MB as zip-file or 30MB for a unpacked Model! In the upper menu Window Settings you can make the following necessary entries for a single 3D-Window: Width and Height: Set here the Window size in pixel (px) or in percent (100%) Color: Select a color for the background of the 3D-Window Image: Select a image for the background of the 3D-Window Color | Image: Select which background will shown in the 3D-Window Camera Pan: With this switch can you enabled the right mouse to move the scene around Camera Lock: This switch lock the camera view, so that a model floor cannot be viewed Camera Damping: This switch set the camera to a smooth dynamic glide movement |
 |
|
Button Settings and Animation control Here can you toggle different buttons that will shown in a single 3D-Window. Animations with the glTF / glb or FBX file format If you have 3D-Models with animation data loaded, can you set it up here with the animation functions and also enable the play button for the 3D-Window in the frontend. Note: The Animation functions are shown only when a 3D-Model are loaded that have animation data! |
 |
Canvasio3D | Woo version
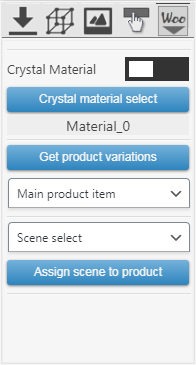
Your 3D-Item in WooCommerce with 360° smooth rotation and zoomingTo use Canvasio3D with your WooCommerce shop is real very easy. After configure you WooCommerce Items, click on the Woo-Icon in Canvasio3D to open the menu. (This Icon is only shown, if you have a product page open.)
For a single item only, click in the Canvasio3D Menu on: "Assign Scene to product". (If you have only a Single product, do you need not to use the Canvasio3D drop down: "Main product item". Load here only a saved Scene like "Scene 1" and click on the button: "Assign to product" and than save your product page.) Also is it possible to display of high-quality diamonds for your 3D-Jewelry. For this load your 3D-Model, click on "Crystal material select" and select a "Diamant"-Part of your model. Than save- and reload your Model. If you like to show a Video in you 3D-Scene are there two ways: First upload you Video with the WordPress media manager. Open than the Canvasio3D Effects menu, select your Video and switch the Video plane on. Or you can use a Video Texture of your own 3D-Model after uploading your Video in WordPress. For this open your 3D-Model in a 3D-Program like Blender and edit there the Material of a Model part. Than enter the material name: "caVideo" for this part. The Video plays automatically, when your 3D-Model is loaded in Canvasio3D only if a Video URL is inserted in the Effects menu!
Please note: The Canvasio3D 3D-Feature for WooCommerce can only be displayed in the front page, if the standard function of the WooCommerce product image has not been changed! (This can happen for example by using a special WooCommerce template or plugin.) |
  |
Problem solutions
|
The response is not a valid JSON response:
You can try to ignore this message, or switch to the classic WordPress Editor Layout & Graphic problems after update: -Simple clear the browser cache and reload the page If you need a 3D-Model for testing: Uploaded Model not loaded:
Model is only black after loading (.obj format) The .obj file format stores all material information in a separate .mtl file, where also are the entries for textures. By exporting of an model can it be, that this entries are not correct. To check it, open the .mtl file with a standard text editor like notepad and search for entries that begins with: map_Kd. After it should only be the name of the texture like e.g.: map_Kd modelTexture.jpg Rotation of the Model are not correct: Canvasio3D rotate ever the camera around the x,y,z world coordinates. Read our blog entry for more: About camera and model rotation |
Model file formats in Canvasio3D
|
STL file format: This format is a simply geometry format and has no material entries for e.g. colors, but you can set one Material for it with Canvasio3D Pro OBJ & MTL file format: This format is not the best for online presentation in browsres but it is popular and can be most simply export with many 3D-Programs. Animation data are here not included and the settings for the material entries are stored in the separat .mtl file. Sometimes can it be with this format, that the 3D-Model shown only black. Mostly comes this when the texture entries in the .mtl file are not correct or the .mtl file was not right exported. glTF and GLB file format: This compact format was developed for some time specifically to display in browser and we would like recommended it for the most 3D-Model presentation in Canvasio3D. It has good material settings and can also stored animation data that you can use in Canvasio3D. More informations about this file format can you find here FBX file format: The FBX file format is owned by Autodesk since 2006 and a very popular format that used in many 3D-Programs. Canvasio3D Light supports the FBX file format without animation and Canvasio3D Pro can shown animations when a loaded 3D-Model have this data. |
Model data in a Zip-Folder
|
Many 3D-Models are very large in MB and therefore it takes a long time to upload them. Therefore we have decided to upload the 3D-models only via zip-file, that will stored in the upload directory of your WordPress website. It is simple to made a zip file for your 3D-Model:
|
Software Disclaimer
|
THIS SOFTWARE IS PROVIDED BY THE COPYRIGHT HOLDERS AND CONTRIBUTORS "AS IS" AND ANY EXPRESS OR IMPLIED WARRANTIES, INCLUDING, BUT NOT LIMITED TO, THE IMPLIED WARRANTIES OF MERCHANTABILITY AND FITNESS FOR A PARTICULAR PURPOSE ARE DISCLAIMED. IN NO EVENT SHALL THE COPYRIGHT HOLDER OR CONTRIBUTORS BE LIABLE FOR ANY DIRECT, INDIRECT, INCIDENTAL, SPECIAL, EXEMPLARY, OR CONSEQUENTIAL DAMAGES (INCLUDING, BUT NOT LIMITED TO, PROCUREMENT OF SUBSTITUTE GOODS OR SERVICES; LOSS OF USE, DATA, OR PROFITS; OR BUSINESS INTERRUPTION) HOWEVER CAUSED AND ON ANY THEORY OF LIABILITY, WHETHER IN CONTRACT, STRICT LIABILITY, OR TORT (INCLUDING NEGLIGENCE OR OTHERWISE) ARISING IN ANY WAY OUT OF THE USE OF THIS SOFTWARE, EVEN IF ADVISED OF THE POSSIBILITY OF SUCH DAMAGE. *Since March 2011, WebGL is supported by Google’s Chrome and Mozilla’s Firefox Web browser, and is enabled by default in browser prerelease versions of Safari and Opera. WebGL requires a 3D hardware acceleration (3D graphics card / 3D chip). Source: Wikipedia |